SID
OK, who is SID? SID refers to a common expression in quilting -- Stitch In the Ditch. SID can make quilters tremble with fear, because it's a real challenge to stitch exactly in a ditch without wobbling. Many quilters will go to great lengths to avoid learning the process, and some quilters will turn down any job that involves SID.
If you are using a computerized system, you may have been taught to click in lots of places along your seam in an effort to have your stitching match the quilt's slight imperfections. This can consume a TON of time, and it just isn't necessary. Think about it logically --- a straight line consists of only two points, the beginning and the end. Clicking anywhere in between these two points implies that the line is not straight, and that you don't want it to be stitched straight.
I know what you are thinking..... "But my customer hasn't sewn a straight seam!" Or, maybe you are just thinking that SID takes too much time because you have been making too many clicks to accomplish your straight lines. Or "My customer hasn't ironed her quilt correctly!".
Ironing is a topic better saved for another day, but if the quilt top you are getting ready to work on has tragically wobbly seams due to an ironing technique, I'd like to suggest that you spend a few minutes correcting the problems before you mount the quilt on your machine.
In the following example, Linda has sewn perfect seams, and her ironing technique is fantastic, so no issues there.
Linda wanted a slight custom treatment of this quilt, with just a bit of SID. She wanted to highlight the gold areas, and have the striped sections recede just a bit. In order to accomplish this, we decided to do SID only around the gold sections, and have the "logs" all blend together as one area.
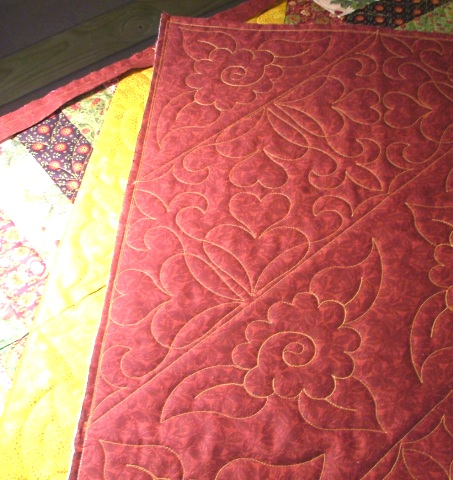
If you look verrryyyy closely, you can see that there was just one seam that wasn't ironed perfectly.(And I really had to look hard to find this one! LOL) I could have clicked about 6 times in order to make the stitching follow the slight wobble, but then that "unstraight" line would be obvious on the back of the quilt which was done in a solid color with contrasting thread.
As you can see from the picture, a better approach to take is to click at the beginning and the end only. If you slow down the speed of the machine just a bit, the fabric can be manipulated with your hands as the machine moves, resulting in a nearly perfect straight line. Straight lines always look better on the back of the quilt.
The larger flower motifs follow the gold sections, and the smaller designs are in the striped section. The denser quilting makes the stripes recede, which is what Linda wanted for this quilt.
Many people wander whether they should do all of the SID first, and then go back and fill in the areas inside. I don't have a particular preference -- it all depends upon the quilt. If there is a lot of horizontal SID, I like to do that first to stabilize the entire piece. I may do SID near the upper border(s), and then more near the belly bar, knowing that the entire area is now stable and I can "wander around" in an efficient manner. If the SID is mostly vertical, I don't worry as much as long as I keep an eye on keeping the quilt square as I work. If there is diagonal SID, as there was in this quilt, I do prefer to do that first so that everything is held in place before the designs are entered.
On your next small project, try incorporating SID. Even if you don't use it between every block, SID can be very effective making certain areas recede and allowing other areas to move forward. You will be happier with the backs of your quilts, too. Keep in mind that a straight line only has one point at the beginning, and one at the end, and your project should move along quickly. Mastering SID is something that takes practice, but you will be very happy when you have mastered the technique.


